This is just a tip for getting better performance out of Windows 7. (Actually most of this will apply to any version of Windows, although the locations of the menu items may be in different places).
Hint: You can click on any of the photos here to enlarge them.
Now ladies, I realize that most women feel a need to spruce things up wherever they go in life, but your computer is no place to do this. I suppose that if you use your computer for nothing more than typing letters, web surfing, and email then having all kinds of fancy desktop displays and gadgets won't hurt anything. But if you get into any serious computer use with processor intensive programs such as editing video, audio, or photographs then it pays to make your computer as responsive as possible. Fancy desktop themes and display items will only bog down the works. All those photographs you're using for your screen saver can be even worse.
One of the first things I would advise is to do away with your screen saver. Simply turn it off. (I'll show you how in a minute.) to There's really no point in them anymore. We have this thing called "Sleep" mode that works fine and dandy, especially with Windows 7. If you're going to be away from your computer for several hours, then simply turn it off. If you're going to be away for a shorter duration of time, say an hour or two at best, then just activate sleep mode from the start button list. Easy enough?
As to desktop displays, the best display is no display, well, more or less. If you can harken back to those ancient days of Windows 3.1 where we only had a plain-jane solid background color and no effects, that's still the best way to go. Windows has always provided a theme that simulates that simple display called "Windows Classic," and you'll find it listed in Windows 7 too.
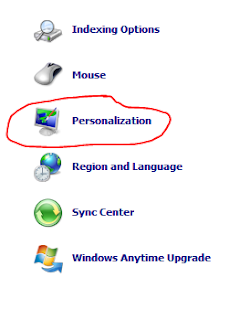
Go to "Control Panel" followed by "Personalization."
Choose "Windows Classic" from the themes.
Your menu fonts will look a little thin and strange after doing this probably, but we'll fix that in a minute. Leave the "Personalization" box up for now.
Something that's always reeked havoc with sound recording buffs are those sounds that Windows plays for everything. The reason for this has to do with audio resolutions. If you're trying to record from your microphone and you have your sound card set to record at 16 bits and a resolution of 44.1 (read as 16/44.1) and then you suddenly get an email notification sound from Windows while you're recording, that Windows sound may be at a different bitrate or resolution than the one you're trying to record at, so your soundcard may suddenly change bitrate or resolution as you're recording. Not cool! So it's always best to turn off the silly Windows notification sounds. Besides, do you really want to hear that annoying clicking sound every time you click your mouse buttons?
Look down at the bottom of the "Personalization" panel and click on "Sounds."
From the pop-up box choose the "Sounds" tab if it isn't already selected. From the "Sound Scheme" drop down box choose "No Sounds."
(This may not take effect until you restart your computer, but don't do that until we're done).
Go to "Control Panel" followed by "Display",
and then click on "Adjust Clear Type Text"
and when the pop-up box appears, make sure the box is checked that says "Turn on Clear Type."
Now go back and look at your menu items in the start menu etc. The text should look a little bolder and clearer now.
Go to "Control Panel" followed by "Performance Information and Tools".
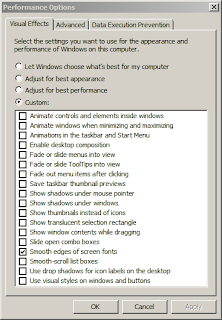
From there click on "Adjust Visual Effects."
A box will pop into view called "Performance Options." It has three tabs. The first is called "Visual Effects." Select "Custom" from the menu. Select only "Smooth Edges of Screen Fonts" here. Leave all other boxes unchecked.
Under the "Advanced" tab select best performance of "Programs."
On the "Data Execution Prevention" tab check the first box labeled "Turn on DEP for essential Windows programs and services only."
Now click "Apply" followed by "Okay" at the bottom of the pop-up box to close it out.
You may want to readjust various icon displays after doing this depending on your size preference for them. You can change the size of the taskbar icons by right-clicking on a blank part of the taskbar and choosing "Properties."
You'll immediately see a checkbox labeled "Use Small Icons" if you want to make them smaller. (I keep this box checked myself).
If you want to change the size of desktop icons, you can do that via the "Personalization" window we had open a few minutes ago. Go back to it and look down by the "Sounds" item we clicked before. To the left of it is an item called "Windows Color."
Click on that, and you'll find a box comes up where you can change just about anything from scroll bar size to fonts and icon sizes in the drop down "Item" menu.
None of the changes you make here can effect system performance, or at least not enough to worry about. You also don't have to have a blue colored desktop (the default with the "Classic Theme"). Choose any color you want. While you still have the "Personalization" box open, if you look down at the bottom right, you'll see an item called "Screen Saver"
and after clicking on it you can choose to turn your screen saver off if you want to by choosing "None" from the drop-down menu.
That should do it. Your computer will thank me. Now you may want to restart your computer.
Oh, one more thing. This has nothing to do with performance, but one of the silliest things MS ever did was to hide file extensions. An extension is generally three letters after the period at the end of a file name. Those letters are an abbreviation of the file type. For example, a bitmap photo would be abbreviated as ".bmp". If I have an audio wave file called "smack_me" then the full file name with extension would read "smack_me.wav". I believe they started doing this automatically with Windows XP (perhaps a bit earlier even with certain versions of Windows 2000). I guess they expect everyone to use the "groups" folder option, something I personally don't like. But even if you choose to show folder items in groups, that may tell you which of your music files are wave files, or which ones are mp3s and so on, but you can't change an extension if you can't see it!, and there are times now and then when you'll want to change one. Also, if you have these files on your desktop rather than in a folder, then you won't have grouping available to show you what kind of file they are. So one of the first things I do after installing Windows is to go into folder options and change things to where I can see the file extensions.
To make file extensions visible, go to Control Panel and click on "Folder Options".
From the pop-up box, choose "View" from the tabs at the top. Look at the drop-down menu for a listing called "Hide Extensions For Known File Types", and uncheck it.
Hit "Apply" at the bottom of the box, and then click "Okay" to close it down.
Friday, March 25, 2011
Subscribe to:
Comments (Atom)


